Pipetting Like a Pro - Best Practice Guide to Proper Pipetting
Correct pipetting is one of the most essential skills in any laboratory, as it has a big impact on how reliable and reproducible your experiments are. Even small variations in volume can lead to big variations in data, wasted reagents, and compromised conclusions. This is especially critical for high-precision techniques such as HPLC, where accuracy and reproducibility are non-negotiable. This best practice guide gives you all the tips and tricks you need to make pipetting easy.
The Pipetting Workflow
A complete pipetting cycle consists of four main steps:
(a) Volume adjustment and tip attachment
(b) Liquid aspiration
(c) Liquid dispensing
(d) Tip ejection
Mastering each step is key to reducing variability and improving overall data quality.

Figure 1: The Pipetting Cycle. (Graphic by KNAUER)
How to Pipette Properly
The Right Immersion Angle for Success

When aspirating liquid, hold the pipette within a 20° angle to vertical. It’s important to keep this angle consistent throughout the whole pipetting process. Changing the angle can alter the hydrostatic pressure inside the tip, resulting in inconsistent aspiration volumes.
Control the Immersion Depth
Always immerse the tip to the recommended depth depending on the pipette volume (see Table 1). Immersing the tip too deeply may cause excessive liquid to be aspirated, as for example, liquid droplets can cling to the tip's outside. On the other hand, insufficient immersion may lead to aspiration of air bubbles, causing too little volume to be delivered. Avoid touching the bottom of the container with the tip, as this can restrict fluid aspiration.

Table 1: Recommended immersion depths based on the pipette volume. (Graphic by KNAUER)
Rhythm and Speed- Smooth Movements are Essential

Try to always use the same pressure and speed when aspirating and dispensing samples to achieve reproducible results. With rapid or jerky movements, you might end up with splashing, aerosols, air bubbles, shaft contamination or sample loss.
This is how it works: Keep the plunger pressure steady and your speed consistent. Press down and release smoothly. After aspirating the sample, wait one second before pulling the tip out of the liquid, allowing it to finish moving into the tip.
Dispense with Precision
To get the best results, touch the tip to the inside wall of the vessel, then slide it up along the wall (Figure 2 (a)). This prevents liquid from clinging to the tip end and ensures that any remaining sample is delivered. When taking the tip out of the target vessel, make sure to keep your thumb pressed on the plunger stop to avoid aspirating the sample back into the tip again.
For aqueous, non-viscous liquids, two other methods also work well.
Dispense directly into the liquid without touching the wall of the vessel (Figure 2 (b)). This wet-dispense method is great for dispensing small volumes, because it keeps the sample from sticking to the sides of the vessel.
Another option is to dispense onto the liquid’s surface (Figure 2 (c)). In this case, gently touch off the sample droplet onto the liquid already in the vessel while pulling the tip away. This method is perfect when dispensing less than 1 µL. Touching the droplet to the liquid helps to pull the small droplet out of the pipette tip, ensuring spot-on volume delivery.
 Side wall touch off – the standard method, (b) into liquid dispense, and (c) surface touch off")
Figure 2: Techniques for dispensing a sample. (a) Side wall touch off – the standard method, (b) into liquid dispense, and (c) surface touch off. (Graphic by KNAUER)
How to Optimize Pipetting Performance
Choose the Correct Volume Range

Air displacement pipettes perform best when used within 35% to 100% of their nominal volume. Avoid using a pipette below 10% of its maximum volume. Pipetting within the pipette’s optimal volume range makes it easier to get accurate results, and since it’s less dependent on technique, it reduces user-related pipetting errors.
Lets´s give you an example: If you need to pipette 10 µL, a pipette with a volume range of 0.5 – 10 µL would be ideal, whereas a 10 – 100 µL one would be the wrong choice. The accuracy and precision errors are smaller with the first option (see Table 2).

Table 2: Recommended immersion depths based on the pipette volume. (Graphic by KNAUER)
Pre-Wet the Tip

Before transferring, aspirate and dispense the sample liquid three times at nominal volume. This helps equalize temperature differences and humidify the air space inside the pipette and tip, improving accuracy. Without pre-wetting, the first few dispenses may deliver less volume due to evaporation.
💡Pro Tip: Pre-wetting is highly recommended for pipette volumes higher than 10 µL. It is especially important when working with volatile samples (e.g. organic solvents)..
How to Handle Viscous or Volatile Liquids Correctly
Use slower speeds and reverse pipetting for viscous samples. The small pipette tip opening and the air column's elasticity make it hard to take in and release viscous liquids quickly. Also, viscous liquids tend to stick to the inside of the tip, which makes it difficult to empty it fully. With reverse pipetting, the selected volume plus an extra dispense is aspirated to compensate for that.
When you’re working with volatile samples, make sure to pre-wet the pipette tip to humidify the air space. Then use reverse pipetting and pipette quickly. The larger volume aspirated means less evaporation affects the actual volume to be dispensed.
💡Pro Tip: Use Reverse Pipetting for Viscous or Volatile Liquids.
Standard versus Reverse Pipetting
Standard or Forward Pipetting (Figure 3 (a))
Forward pipetting is the most common technique and works well for aqueous, non-viscous samples. Here´s how it works:
- Press the plunger down until the first stop.
- Slowly let go of the plunger to raise the piston, aspirating the sample into the tip.
- Press the plunger down gently to the first stop again to dispense the sample into the target. Then, after a quick pause of about one second, keep pressing the plunger down to the second stop.
- This will empty the tip completely. Release the plunger to the ready position.
- Change the tip and continue pipetting.
Reverse Pipetting (Figure 3 (b))
Reverse pipetting is best used for viscous, foaming, or volatile samples improving accuracy. This is how you do it:
- Push the plunger down to the second stop.
- Slowly let go of the plunger to raise the piston, aspirating the sample into the tip.
- Press the plunger down gently to the first stop only to dispense the sample into the target.
- Hold the plunger at the first stop. You'll see some liquid left in the tip, but this should not be dispensed. The remaining liquid should either be discarded with the tip or you can put it back into the original reagent reservoir by pushing the plunger down to the second stop.
Note: Ensure the additional volume can be aspirated without contacting the pipette shaft or tip filter.
 Standard or forward pipetting and (b) reverse pipetting")
Figure 3: Pipetting techniques. (a) Standard or forward pipetting and (b) reverse pipetting. (Graphic by KNAUER)
Density Matters – Recalibration Based on Liquid Density

Pipettes are tested and calibrated at the manufacturer's site with water at room temperature; pipetting liquids with other densities results in inaccuracy. Recalibrate your pipette when using liquids with densities that are significantly different from that of water. You can make individual adjustments for such types of liquids with the calibration tool. Otherwise, your numbers may look precise – but be completely wrong.
Use the Right Tip
If the fit tip isn't right, even the best technique can be ruined. It's best to use tips that are specifically designed for certain pipettes. Usually, the manufacturer's tips work well. Other brands are okay too if they are compatible with the pipette model you're using. Mismatched tips and pipettes can lead to inaccuracy or imprecision. Perfect tips will create an airtight seal without having to use too much force, are made of high-quality material, and have no defects, ensuring your sample is delivered reliably.
💡Pro Tip: BlueOrchid pipette tips are the perfect match to our BlueOrchid pipettes for maximum performance and reliability.
Environmental Factors to Think About
Temperature

Allow pipette, tips and liquids to equilibrate to room temperature before starting pipetting. Try to avoid areas that are drafty or in direct sunlight, as these can cause sudden or large changes in temperature. Temperature fluctuations cause volume variations of the air cushion inside the pipette, which can reduce the overall precision of sample delivery. An optimal pipetting temperature is between 20°C and 25°C.
Proper Pipette Handling

Always place the pipette in a stand or put it down between uses. Heat from your hand, especially during extended periods of pipetting, can cause the air inside the pipette to expand, leading to inaccurate results. Never leave the pipette lying flat on the bench with liquid in the tip, as this might cause liquid to enter the pipette and potentially damage its internal parts.
Setting the Volume Correctly
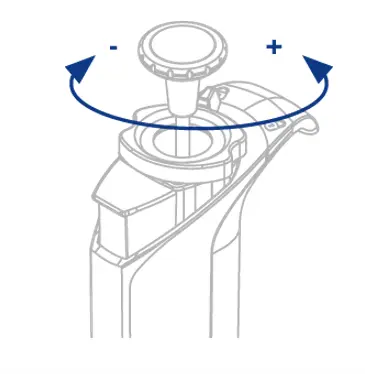
When changing to a lower volume, just set the desired volume directly. When changing to a higher volume, turn the volume wheel about one-third of a turn above the desired level, then slowly go back to the volume setting you want.
Calibration and Cleaning

Calibrate the pipette at least once a year to maintain accuracy and precision within specifications. Regularly clean its external surfaces using a non-abrasive cloth dampened in isopropanol.
Change the Tip

Always replace the tip between samples, and at least whenever changing the dispensed liquid or if droplets are left inside. This prevents carry-over and cross-contamination, making sure your data is reliable.
💡Pro Tip: Tired of inserting each tip by hand into the rack box? Use our reload units to quickly and easily refill your tip boxes.
Ergonomics: Hands first

A healthy posture while pipetting lowers fatigue and the risk of repetitive strain injury, enhancing accuracy and performance.
Our BlueOrchid Pipettes are designed with user comfort in mind:
- Extremely low plunging force
- Magnet-assisted piston with an innovative spring and seal design
- Lightweight, balanced weight distribution
- Shock absorption mechanism for smooth tip ejection
This makes pipetting really comfortable and truly effortless, so your hands won’t get tired during long pipetting sessions. Check out all the features BlueOrchid has to offer here.

Figure 5: BlueOrchid Pipettes. (Image by KNAUER)
Final Thoughts
Remember, it takes practice, attention to detail and consistent adherence to best practices to master proper pipetting technique and performance. If you follow the guidelines outlined in this blog, you can minimize errors, improve the quality of your data and enhance the overall reliability of your experiments. Even the smallest improvements in technique can make a big difference to your results – so take the time to pipette with precision and care.
For further information on this topic, please contact our author: surname@knauer.net
Resources
BRAND GmbH & Co KG, Poster, 10 steps to becoming a pipetting pro, https://www.brand.de/brand/contentserv_data/Context/BRAND%20GMBH%20%2B%20CO%20KG/Dokumente/Produkte/Banner%20und%20Plakate/Handout_Pipetting_pro_EN.pdf (last accessed: 2025-10-31, 8:02).
Mettler-Toledo LLC, Poster, Good Pipetting Practice, https://www.mt.com/de/en/home/library/know-how/rainin-pipettes/rainin-pipetting-techniques-poster.html (last accessed: 2025-10-31, 7:56).
Corning Inc., Poster, Good Pipetting Practice, https://www.corning.com/catalog/cls/documents/infographics/CLS-A-EQ-119.pdf (last accessed: 2025-10-31, 8:04).
INTEGRA Biosciences Corp., Poster, Handheld Pipetting – Best Practices, https://www.integra-biosciences.com/global/en/pipetting-tips (last accessed: 2025-10-31, 7:52).
Eppendorf SE, Poster, Pipetting Techniques, https://www.eppendorf.com/product-media/doc/en/72923/Eppendorf_Liquid-Handling_Poster_Manual-Pipettes_Pipetting-Techniques.pdf (last accessed: 2025-10-31, 8:07).